> For the complete documentation index, see [llms.txt](https://docs.flatredball.com/gum/llms.txt). Markdown versions of documentation pages are available by appending `.md` to page URLs; this page is available as [Markdown](https://docs.flatredball.com/gum/code/layout/anchor-and-dock.md).
# Anchor and Dock
## Introduction
`Anchor` and `Dock` are methods used to position and size the calling object.
These methods match the Anchor and Dock actions which can be performed in the Gum UI tool.
`Anchor` adjusts the position of an object without changing its size.
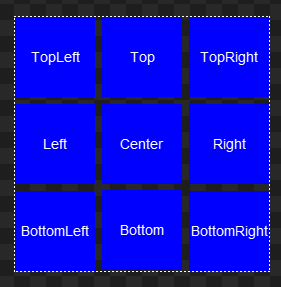
Nine standard anchor values
`Anchor` has 2 other values `CenterHorizontally` and `CenterVertically`.
1. `CenterHorizontally` sets the X related variables only, leaving the Y related variables unchanged.
2. `CenterVertically` sets the Y related variables only, leaving the X related variables unchanged.
This allows you to Have an element locked to the center position of the horizontal or vertical, but modify the other value.
`Dock` changes the position and size of an object. `Dock` can be used to adjust horizontal or vertical values.
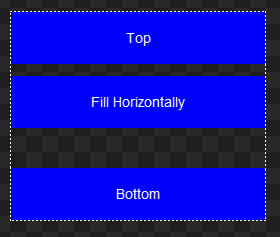
Dock values adjusting horizontal size
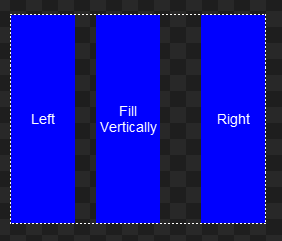
Dock values adjusting vertical size
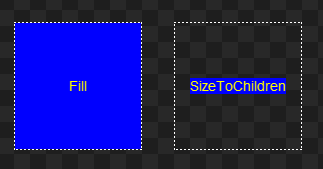
`Dock` can also adjust both vertical and horizontal values using `Fill` or `Size to Children`.
Fill and SizeToChildren adjusts both Width and Height values
## Code Example: Calling Anchor and Dock
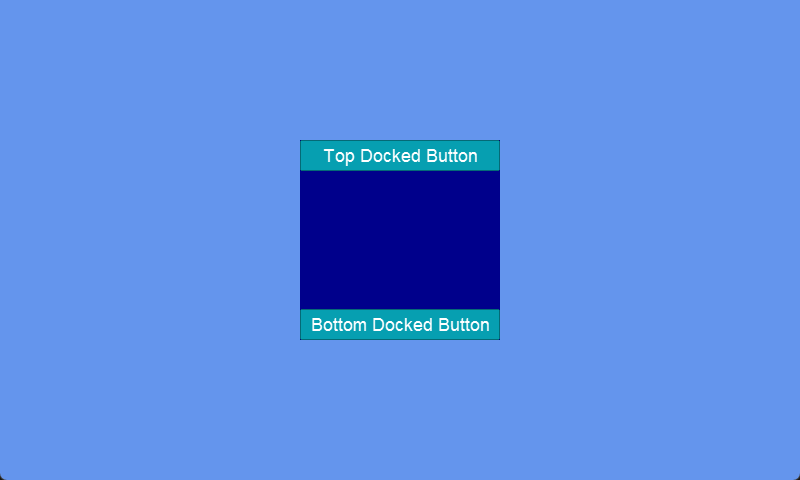
The following code shows how to create a centered panel using `Anchor`. Two buttons are added, with the first using `Dock.Top` and the other using `Dock.Bottom`.
```csharp
// Initialize
var panel = new Panel();
panel.AddToRoot();
panel.Anchor(Gum.Wireframe.Anchor.Center);
// give this an explicit size, so docked buttons
// can fill it:
panel.Width = 200;
panel.WidthUnits = Gum.DataTypes.DimensionUnitType.Absolute;
panel.Height = 200;
panel.HeightUnits = Gum.DataTypes.DimensionUnitType.Absolute;
var background = new ColoredRectangleRuntime();
panel.AddChild(background);
background.Color = Color.DarkBlue;
background.Dock(Gum.Wireframe.Dock.Fill);
var button = new Button();
panel.AddChild(button);
button.Dock(Gum.Wireframe.Dock.Top);
button.Text = "Top Docked Button";
var button2 = new Button();
panel.AddChild(button2);
button2.Dock(Gum.Wireframe.Dock.Bottom);
button2.Text = "Bottom Docked Button";
```
Buttons and background docked to a parent
## Property Assignment
Both `Anchor` and `Dock` are methods which assign properties on the calling object.
`Anchor` modifies:
* `X`
* `XUnits`
* `XOrigin`
* `Y`
* `YUnits`
* `YOrigin`
* `HorizontalAlignment` (if called on a `TextRuntime`)
* `VerticalAlignment` (if called on a `TextRuntime`)
`CenterVertically` and `CenterHorizontally` only modify variables on their respective axis.
`Dock` modifies:
* `X`
* `XUnits`
* `XOrigin`
* `Y`
* `YUnits`
* `YOrigin`
* `Height`
* `HeightUnits`
* `Width`
* `WidthUnits`
* `HorizontalAlignment` (if called on a `TextRuntime`)
* `VerticalAlignment` (if called on a `TextRuntime`)
`Left` , `Right`, and `FillVertically` do not modify `Width` or `WidthUnits`.
`Top`, `Bottom`, and `FillHorizontally` do not modify `Height` or `HeightUnits`.
SizeToChildren only modifies `Height`, `HeightUnits`, `Width`, and `WidthUnits` .
## Modifications After Anchor and Dock
{% hint style="info" %}
Since `Dock` and `Anchor` values modify `X` and `Y`, calling either `Dock` or `Anchor` can overwrite any previously-set `X` and `Y` values. Similarly, `Width` and `Height` can also be overwritten depending on the call made. As a rule of thumb it's best to first call `Anchor` or `Dock`, then assign additional properties after.
{% endhint %}
Once either `Anchor` or `Dock` are called, additional property assignments can be made to the object, its parent, or its children, and positions and sizes will adjust accordingly.
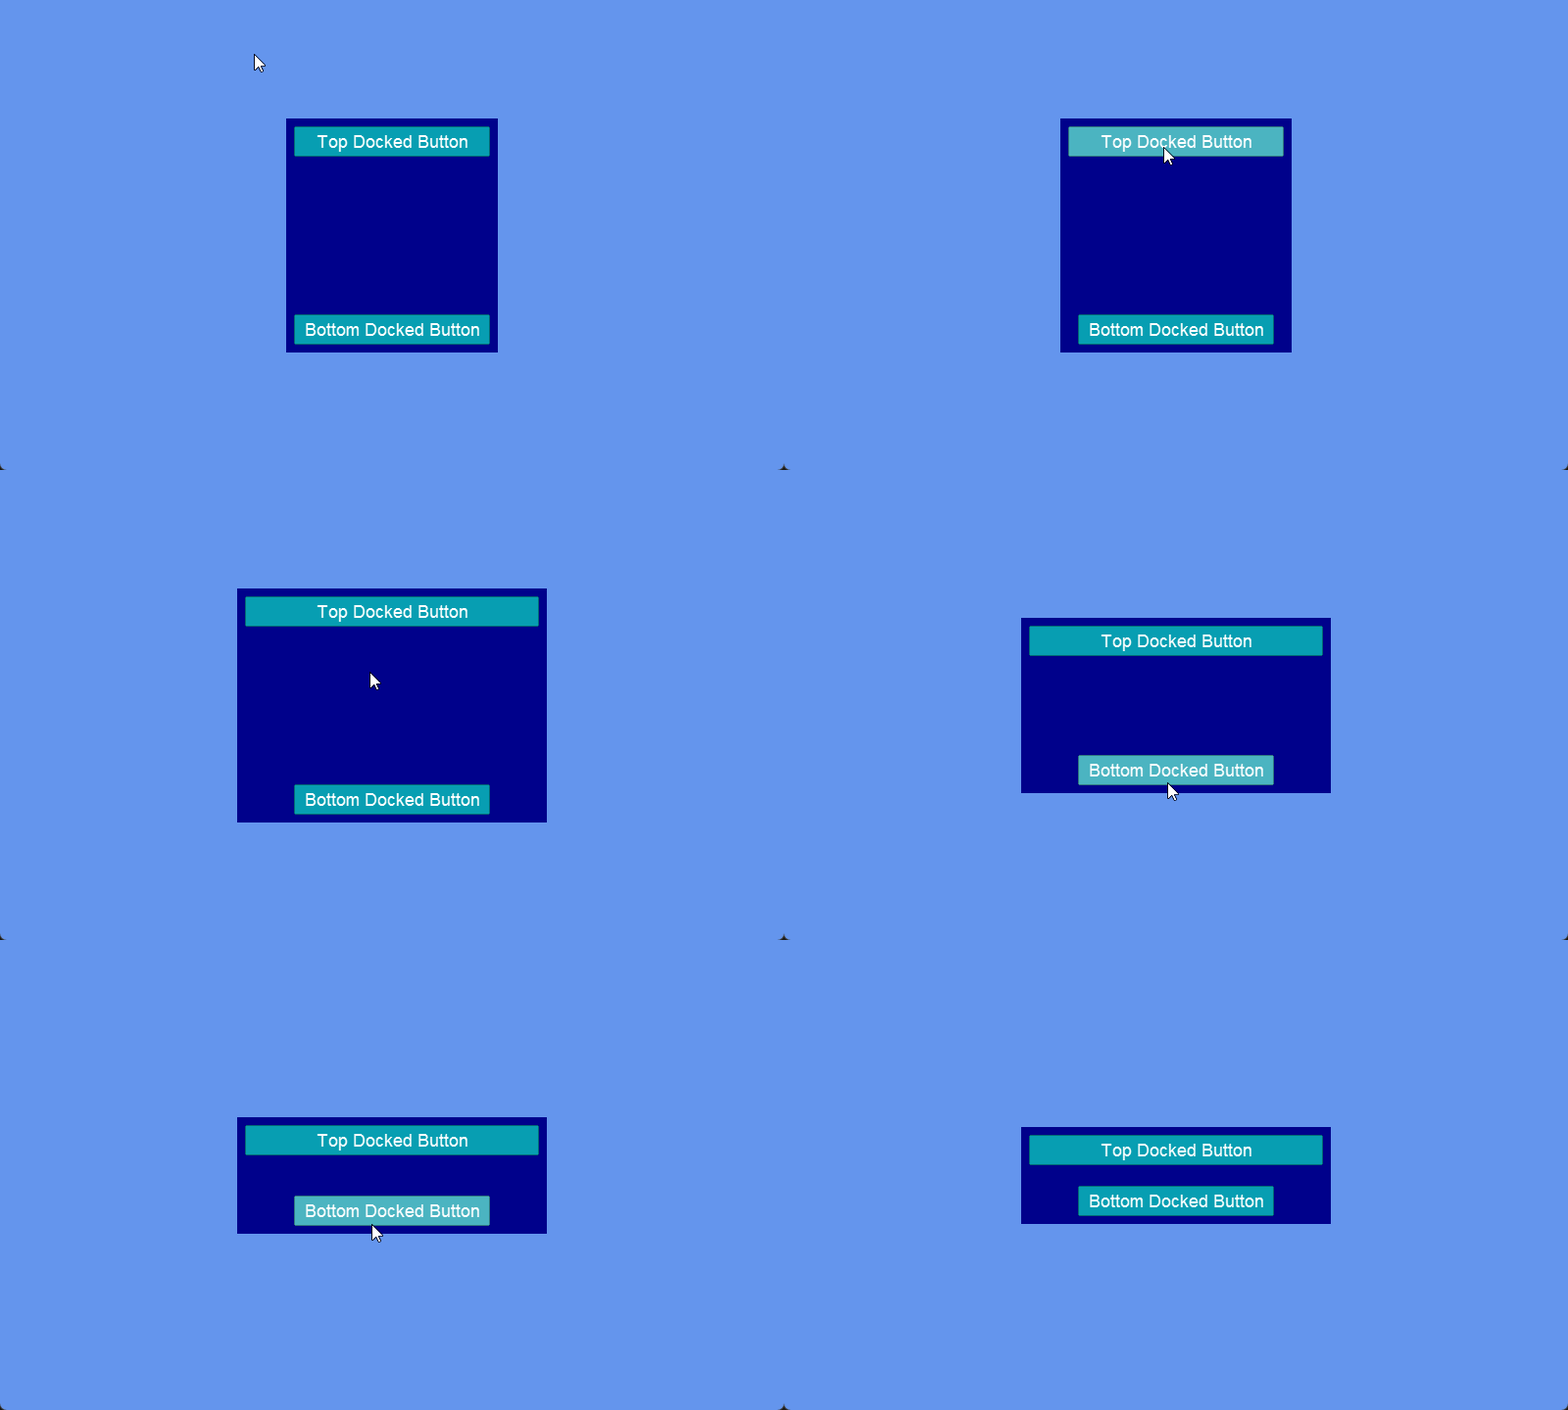
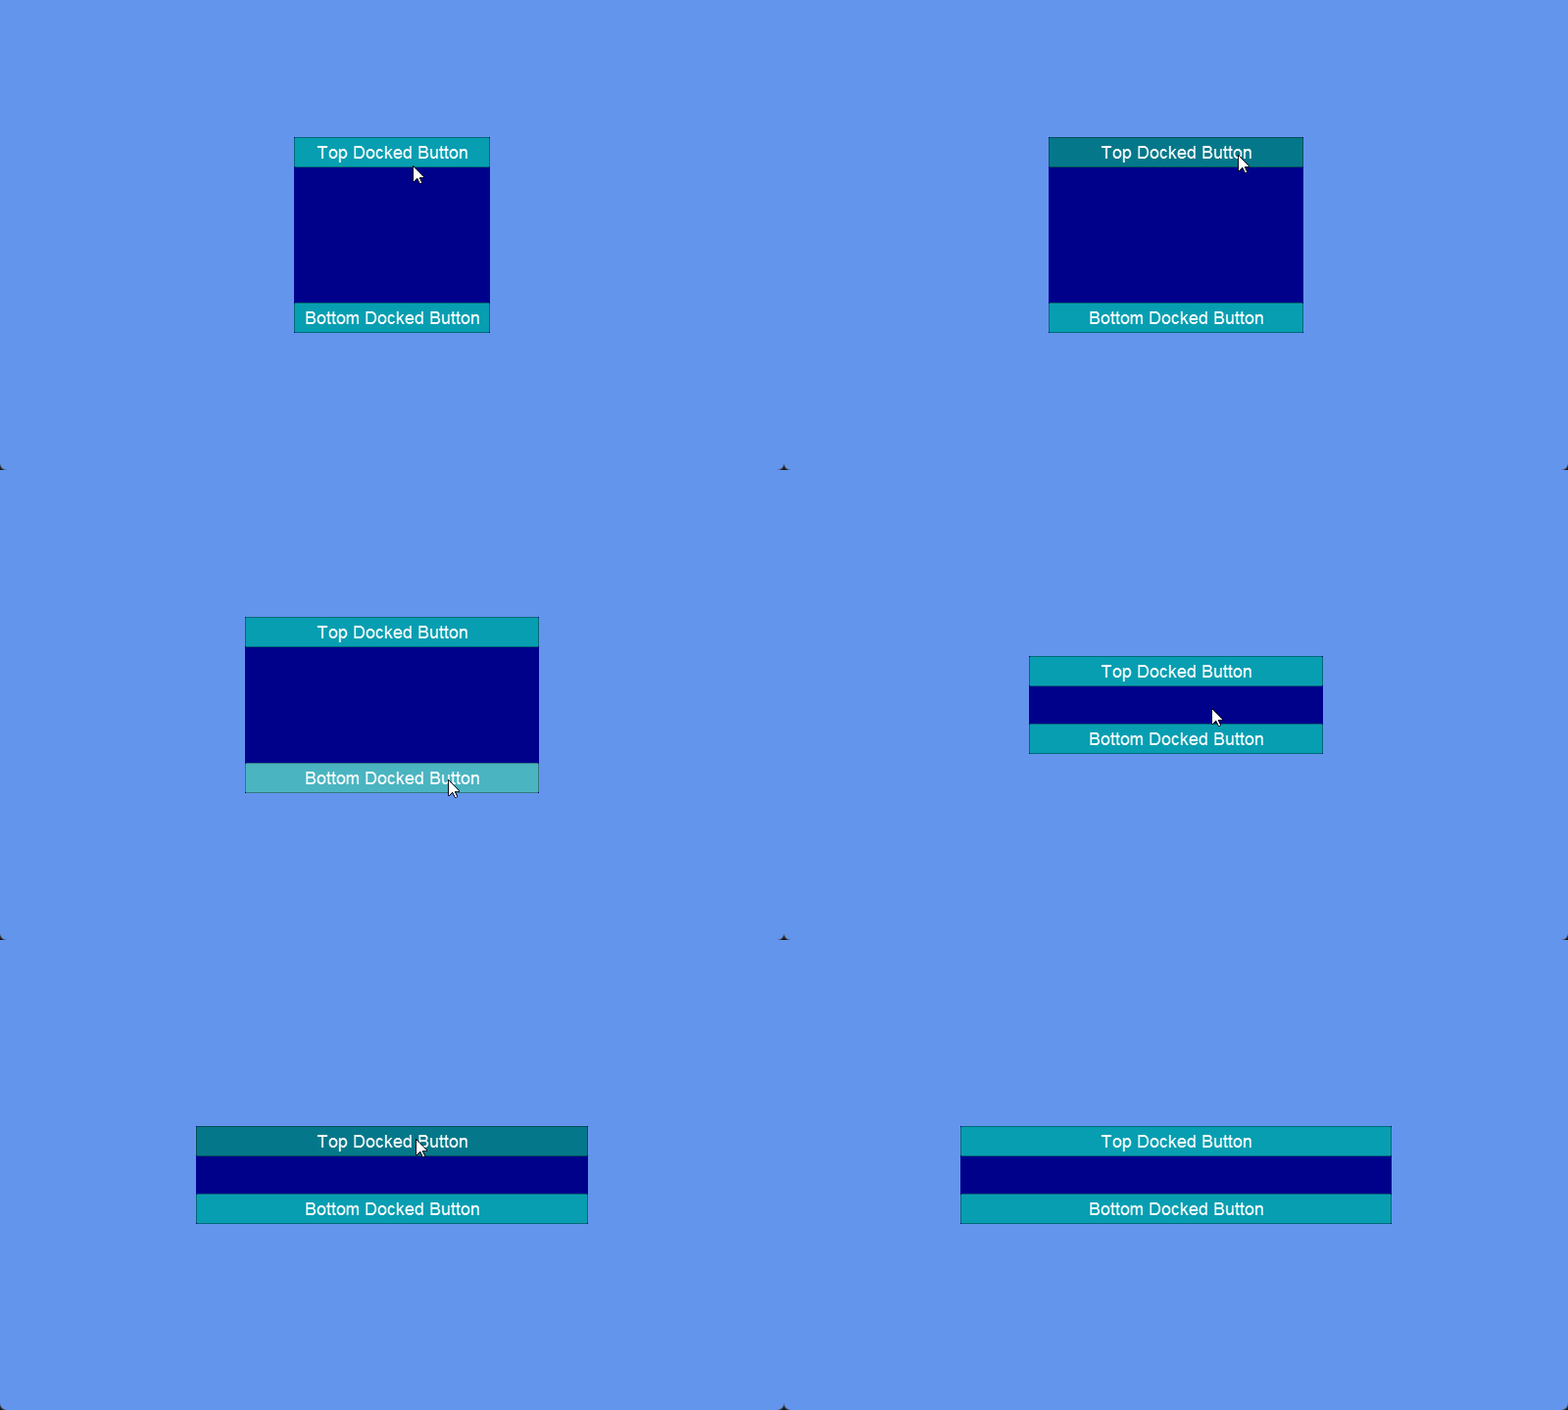
For example, we could add events to each of the `Buttons` above to adjust the `Panel's` `Width` and `Height`. When the `Panel` adjusts, the buttons and background automatically in response.
// Initialize
var panel = new Panel();
panel.AddToRoot();
panel.Anchor(Gum.Wireframe.Anchor.Center);
// give this an explicit size, so docked buttons
// can fill it:
panel.Width = 200;
panel.WidthUnits = Gum.DataTypes.DimensionUnitType.Absolute;
panel.Height = 200;
panel.HeightUnits = Gum.DataTypes.DimensionUnitType.Absolute;

var background = new ColoredRectangleRuntime();
panel.AddChild(background);
background.Color = Color.DarkBlue;
background.Dock(Gum.Wireframe.Dock.Fill);

var button = new Button();
panel.AddChild(button);
button.Dock(Gum.Wireframe.Dock.Top);
button.Text = "Top Docked Button";
// this button makes the panel wider:
button.Click += (_, _) => panel.Width += 20;

var button2 = new Button();
panel.AddChild(button2);
button2.Dock(Gum.Wireframe.Dock.Bottom);
button2.Text = "Bottom Docked Button";
// this button makes the panel shorter:
button2.Click += (_, _) => panel.Height -= 20;
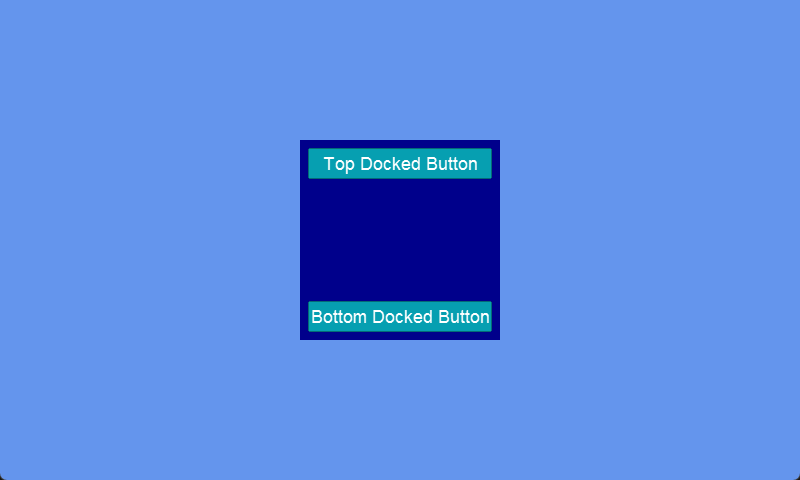
Similarly, we can adjust the position or size of our `Buttons` after calling `Dock` to create margins. Gum does not have Margin or Padding properties, but these can be effectively created using position (`X` or `Y`) and size values (`Width` or `Height`) as shown in the following code:
// Initialize
var panel = new Panel();
panel.AddToRoot();
panel.Anchor(Gum.Wireframe.Anchor.Center);
// give this an explicit size, so docked buttons
// can fill it:
panel.Width = 200;
panel.WidthUnits = Gum.DataTypes.DimensionUnitType.Absolute;
panel.Height = 200;
panel.HeightUnits = Gum.DataTypes.DimensionUnitType.Absolute;

var background = new ColoredRectangleRuntime();
panel.AddChild(background);
background.Color = Color.DarkBlue;
background.Dock(Gum.Wireframe.Dock.Fill);

float buttonMargin = 8;

var button = new Button();
panel.AddChild(button);
button.Dock(Gum.Wireframe.Dock.Top);
button.Y = buttonMargin;
button.Width = -buttonMargin * 2;
button.Text = "Top Docked Button";
// this button makes the panel wider:
button.Click += (_, _) => panel.Width += 20;

var button2 = new Button();
panel.AddChild(button2);
button2.Dock(Gum.Wireframe.Dock.Bottom);
button2.Y = -buttonMargin;
button2.Width = -buttonMargin * 2;
button2.Text = "Bottom Docked Button";
// this button makes the panel shorter:
button2.Click += (_, _) => panel.Height -= 20;
Buttons with margins
To create the top margin for the top `Button`, a positive `Y` value is used to move the `Button` downward. By contrast, a negative `Y` value is used to move the bottom `Button` upward.
Once a `Button` is given a `Top` or `Bottom` `Dock`, its `Width` value is relative to its parent (the `Panel`), so a negative `Width` value shrinks the `Button` relative to its parent. The `buttonMargin` must be applied on both the left and right side, so the `Width` value is modified by twice the `buttonMargin` value.
Alternatively, an internal `Panel` can be used to create a margin. Although this does add extra code, additional `Panels` can be used to create advanced layouts or to organize your elements for maintainability. The following code uses a dedicated `Panel` named `innerPanel` to create margins for the `Buttons`:
// Initialize
var panel = new Panel();
panel.AddToRoot();
panel.Anchor(Gum.Wireframe.Anchor.Center);
// give this an explicit size, so docked buttons
// can fill it:
panel.Width = 200;
panel.WidthUnits = Gum.DataTypes.DimensionUnitType.Absolute;
panel.Height = 200;
panel.HeightUnits = Gum.DataTypes.DimensionUnitType.Absolute;

var background = new ColoredRectangleRuntime();
panel.AddChild(background);
background.Color = Color.DarkBlue;
background.Dock(Gum.Wireframe.Dock.Fill);

float buttonMargin = 8;

var innerPanel = new Panel();
panel.AddChild(innerPanel);
innerPanel.Dock(Gum.Wireframe.Dock.Fill);
innerPanel.Width = -buttonMargin * 2;
innerPanel.Height = -buttonMargin * 2;

var button = new Button();
innerPanel.AddChild(button);
button.Dock(Gum.Wireframe.Dock.Top);
button.Text = "Top Docked Button";
// this button makes the panel wider:
button.Click += (_, _) => panel.Width += 20;

var button2 = new Button();
innerPanel.AddChild(button2);
button2.Dock(Gum.Wireframe.Dock.Bottom);
button2.Text = "Bottom Docked Button";
// this button makes the panel shorter:
button2.Click += (_, _) => panel.Height -= 20;
## Dock and Parent/Child Dependencies
When working with Dock calls, it's important to understand the dependencies created between parent and child.
Our code above creates a top-down dependency where `panel` ultimately decides the size of its children.
The bottom-most children (`button` and `button2`) depend on their parent for their effective positioning and sizing. The parent for both Buttons is either `innerPanel` or `panel`, depending on whether the `innerPanel` is being used for margins. In either case, the Button `Width` values are *relative* to their parent's effective width.
Similarly, `background` also depends on its parent panel for both its `Width` and `Height`.
If `innerPanel` is included, then the dependency exists across multiple levels. In other words, `panel's` `Width` changes `innerPanel's` effective width, which changes `button` and `button2's` effective width.
### Circular Dependencies
Since the `panel` is ultimately the deciding control for width, we explicitly set its `WidthUnits` and `HeightUnits` to `Absolute`. If we remove this, then the panel's default `WidthUnits` and `HeightUnits` are used, which result in the `Panel` being sized to its children. This creates a circular dependency, resulting in our buttons having an effective width of 0 as shown in the following code:
// Initialize
var panel = new Panel();
panel.AddToRoot();
panel.Anchor(Gum.Wireframe.Anchor.Center);
// Remove the explicit size so that it sizes to its contents, causing
// a circular reference:
//panel.Width = 200;
//panel.WidthUnits = Gum.DataTypes.DimensionUnitType.Absolute;
//panel.Height = 200;
//panel.HeightUnits = Gum.DataTypes.DimensionUnitType.Absolute;

var background = new ColoredRectangleRuntime();
panel.AddChild(background);
background.Color = Color.DarkBlue;
background.Dock(Gum.Wireframe.Dock.Fill);

float buttonMargin = 8;

var button = new Button();
panel.AddChild(button);
button.Dock(Gum.Wireframe.Dock.Top);
button.Y = buttonMargin;
button.Width = -buttonMargin * 2;
button.Text = "Top Docked Button";
// this button makes the panel wider:
button.Click += (_, _) => panel.Width += 20;

var button2 = new Button();
panel.AddChild(button2);
button2.Dock(Gum.Wireframe.Dock.Bottom);
button2.Y = -buttonMargin;
button2.Width = -buttonMargin * 2;
button2.Text = "Bottom Docked Button";
// this button makes the panel shorter:
button2.Click += (_, _) => panel.Height -= 20;
Buttons with 0 width, wrapping their text
We can resolve this by bringing back the code to make `panel` be sized with absolute units (pixels), or we can size everything bottom-up as shown in the next section.
### Bottom-Up Dependencies
We can invert the dependencies by giving the bottom-most children (`button` and `button2`) absolute size values, then sizing their parents according to children. For example, the following code sizes the entire `Panel` according to its children.
// Initialize
float buttonMargin = 8;

var panel = new Panel();
panel.AddToRoot();
panel.Anchor(Gum.Wireframe.Anchor.Center);
panel.Dock(Gum.Wireframe.Dock.SizeToChildren);
// Since the panel now depends on its children, the panel
// is the one in charge of bottom and right margins.
// Top margin is handled by the first button.
panel.Width = buttonMargin * 2;
panel.Height = buttonMargin;

var background = new ColoredRectangleRuntime();
panel.AddChild(background);
background.Color = Color.DarkBlue;
background.Dock(Gum.Wireframe.Dock.Fill);

var button = new Button();
panel.AddChild(button);
button.Anchor(Gum.Wireframe.Anchor.Top);
// the button adjusts its Y value to produce a top margin:
button.Y = buttonMargin;
button.Width = 200;
button.Text = "Top Docked Button";
button.Click += (_, _) => button.Width += 20;

var button2 = new Button();
panel.AddChild(button2);
button2.Anchor(Gum.Wireframe.Anchor.Top);
button2.Y = 200;
button2.Width = 200;
button2.Text = "Bottom Docked Button";
// this button makes the panel shorter:
button2.Click += (_, _) => button2.Y -= 20;
Buttons now deciding the parent's size
## Bottom-Up and Top-Down Mixed Dependencies
Although the section above focuses on bottom-up dependencies, the control is actually using both bottom-up and top-down dependencies. The relationships are as follows:
* `button` and `button2` are using absolute `Width` and `Y` values
* `panel` depends on its children, so it sizes itself according to `button` and `button2`
* `background` is sized according to its parent (`panel`), so it resolves its size after the parent `panel` determines its own size
In situations where dependencies go both-ways, Gum attempts to resolve absolute positions and widths first, then performs layout logic in order of dependencies.
---
# Agent Instructions
This documentation is published with GitBook. GitBook is the documentation platform designed so that both humans and AI agents can read, navigate, and reason over technical content effectively. Learn more at gitbook.com.
## Querying This Documentation
If you need additional information that is not directly available in this page, you can query the documentation dynamically by asking a question.
Perform an HTTP GET request on the current page URL with the `ask` query parameter, and the optional `goal` query parameter:
```
GET https://docs.flatredball.com/gum/code/layout/anchor-and-dock.md?ask=&goal=
```
`ask` is the immediate question: it should be specific, self-contained, and written in natural language.
`goal` is optional and describes the broader end goal you are ultimately trying to accomplish on behalf of the user. GitBook uses it to tailor the answer towards what is most useful for that goal.
The response will contain a direct answer to the question and relevant excerpts and sources from the documentation.
Use this mechanism when the answer is not explicitly present in the current page, you need clarification or additional context, or you want to retrieve related documentation sections.

%20(1)%20(1)%20(1)%20(1).png?alt=media)