Texture Coordinates
Introduction
The TextureCoordinate property provides the ability for Sprites to display part of a Texture2D. By default, Sprites display their entire Texture. Sprites in FRB often do not display their entire Texture, instead dispalying a portion of a Texture which contiains multiple individual frames.
Texture Coordinates allow you to display a portion of an image. Texture Coordinates also let you display "more" of a texture. Examples include stretching the edge pixels or wrapping (tiling) the texture.
Example - Setting Texture Coordiantes in the FRB Editor
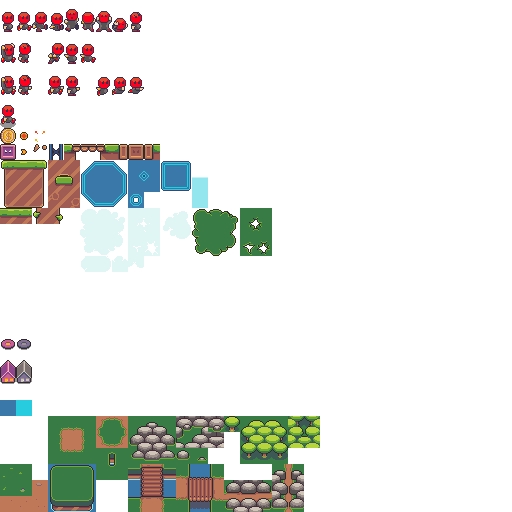
Texture coordiantes can be manually set on a Sprite in the FRB editor. For example, consider the following image:

This image is an example of a sprite sheet combining multiple graphics into one file. This is often performed to improve loading and runtime efficiency. A single Sprite may display a portion of the image. To display part of an image, a Sprite can specify the four coordinates (left, right, top, and bottom). For example, the coin image has the following values in the image:
Left = 0
Right = 16
Top = 128
Bottom = 144

These values can be obtained through most image editors. The following image shows how to obtain these values in Paint.NET:

These values can be set in the FRB Editor as shown in the following image:

Keep in mind that the FRB Editor uses pixels as its unit for convenience. When working with Sprites in code, you can use either pixel or UV coordinates (values between 0 to 1).
Understanding TextureCoordinates and Pixels
By default all texture coordinates for a Sprite are either 0 or 1. This might seem a little weird considering Sprites usually do not reference textures of only 1 pixel size. Furthermore, regardless of the size of the referenced texture the texture coordinates will always default to 0 or 1. What does this mean? For a number of reasons, 3D APIs like DirectX and XNA use 0 - 1 for texture coordinates regardless of the width of the texture. The coordinate (0,0) indicates the top-left of the texture while the coordinate (1,1) represents the bottom right of the coordinate. The coordinate (1,0) is the top right. Therefore, if you are used to working with pixels, you need to divide your desired pixel coordinate by the width and height of your texture to get the desired texture coordinate. The following code converts a pixel coordinate to a texture coordinate.
int desiredPixelCoordinateX = 16;
int desiredPixelCoordinateY = 22;

float textureCoordinateX = desiredPixelCoordinateX / (float)someTexture.Width;
float textureCoordinateY = desiredPixelCoordinateY / (float)someTexture.Height;
Texture Coordinates
Sprites support setting texture coordinates on each vertex. This is useful for drawing from a sprite sheet. The vertex at index 0 is the top left. The count increases clockwise as follows:
0----1
|    |
3----2
The default values are:
mVertices[0].TextureCoordinate.X = 0;
mVertices[0].TextureCoordinate.Y = 0;

mVertices[1].TextureCoordinate.X = 1;
mVertices[1].TextureCoordinate.Y = 0;

mVertices[2].TextureCoordinate.X = 1;
mVertices[2].TextureCoordinate.Y = 1;

mVertices[3].TextureCoordinate.X = 0;
mVertices[3].TextureCoordinate.Y = 1;
Or graphically:
(0,0)----------(1, 0)
|                   |
|                   |
|                   |
|                   |
|                   |
(0,1)----------(1, 1)
Values range between 0 and 1 regardless of texture size, so conversions are necessary to work in pixel values. The following code creates three Sprites with modified texture coordinates.
Sprite sprite1 = SpriteManager.AddSprite("redball.bmp");
sprite1.Vertices[0].TextureCoordinate.X = .4f;
sprite1.Vertices[2].TextureCoordinate.Y = .6f;
sprite1.Vertices[3].TextureCoordinate.X = .4f;
sprite1.Vertices[3].TextureCoordinate.Y = .6f;

Sprite sprite2 = SpriteManager.AddSprite("redball.bmp");
sprite2.Vertices[2].TextureCoordinate.Y = .5f;
sprite2.Vertices[3].TextureCoordinate.Y = .5f;
sprite2.X = 3;

// This Sprite's texture coordinates are not axis aligned.
// This can cause graphical artifacts so be careful.
Sprite sprite3 = SpriteManager.AddSprite("redball.bmp");
sprite3.Vertices[0].TextureCoordinate.X = .2f;
sprite3.Vertices[0].TextureCoordinate.Y = .3f;
sprite3.X = 6;
TextureCoordinate Properties
Rather than working directly with the Vertices property, the Sprite exposes four properties to help set texture coordinates. These can be used to set texture coordinates much easier. The following two pieces of code produce identical results:
sprite1.Vertices[0].TextureCoordinate.X = .4f;
sprite1.Vertices[2].TextureCoordinate.Y = .6f;
sprite1.Vertices[3].TextureCoordinate.X = .4f;
sprite1.Vertices[3].TextureCoordinate.Y = .6f;

// AND

sprite1.LeftTextureCoordinate = .4f;
sprite1.BottomTextureCoordinate = .6f;
Tiling Graphics
Using TextureCoordinates outside of the 0-1 range enables you to tile textures. In other words, to tile an object vertically 5 times, you would want to set the right side TextureCoordinate's X's to 5:
mVertices[1].TextureCoordinate.X = 5;
mVertices[2].TextureCoordinate.X = 5;
You must also make sure that you have set the TextureAddressMode to TextureAddressMode.Wrap. See the TextureAddressMode page for more information.
Last updated
Was this helpful?