> For the complete documentation index, see [llms.txt](https://docs.flatredball.com/flatredball/llms.txt). Markdown versions of documentation pages are available by appending `.md` to page URLs; this page is available as [Markdown](https://docs.flatredball.com/flatredball/tiled-plugin/flatredball-tilegraphics-layeredtilemap.md).
# LayeredTileMap
### Introduction
The LayeredTileMap object is the runtime type for the TMX file format (the native file format for Tiled). Whenever a TMX file is added to FlatRedBall, it will (by default) be loaded into a LayeredTileMap at runtime. The LayeredTileMap represents a collection of [MapDrawableBatches](https://github.com/flatredball/FlatRedBallDocs/tree/main/frb/docs/index.php). It contains one [MapDrawableBatch](https://github.com/flatredball/FlatRedBallDocs/tree/main/frb/docs/index.php) per layer in the source TMX file. The LayeredTileMap class inherits from [FlatRedBall.PositionedObject](https://github.com/flatredball/FlatRedBallDocs/tree/main/frb/docs/index.php) so it can be moved and attached to other [PositionedObjects](https://github.com/flatredball/FlatRedBallDocs/tree/main/frb/docs/index.php). Each MapDrawableBatch is attached to its parent LayeredTileMap, and can be moved independently by changing its [RelativePosition](https://github.com/flatredball/FlatRedBallDocs/tree/main/frb/docs/index.php).
### Common Usage
The easiest way to use a TMX file is to create a standard GameScreen and Level. This can be accomplished using one of the following methods:
1. Run the Wizard when creating a new project - this will automatically add TMX files to your project.
 Existing (empty) projects can also run the wizard through the Quick Actions tab.

2. Create a GameScreen and Level screens and check the options for creating TMX files. 

### Manually Adding a MapDrawableBatch From TMX to a Screen
If you are not using the GameScreen/Level pattern, you can add your own TMX files to Screens manually. To add a LayeredTileMap from an existing TMX:
1. Create a TMX file in Tiled
2. Save the TMX file in a location relative to your game's content folder. Be sure that all PNG files and TSX files (tileset files) are also relative to the game content folder
3. Create a game screen
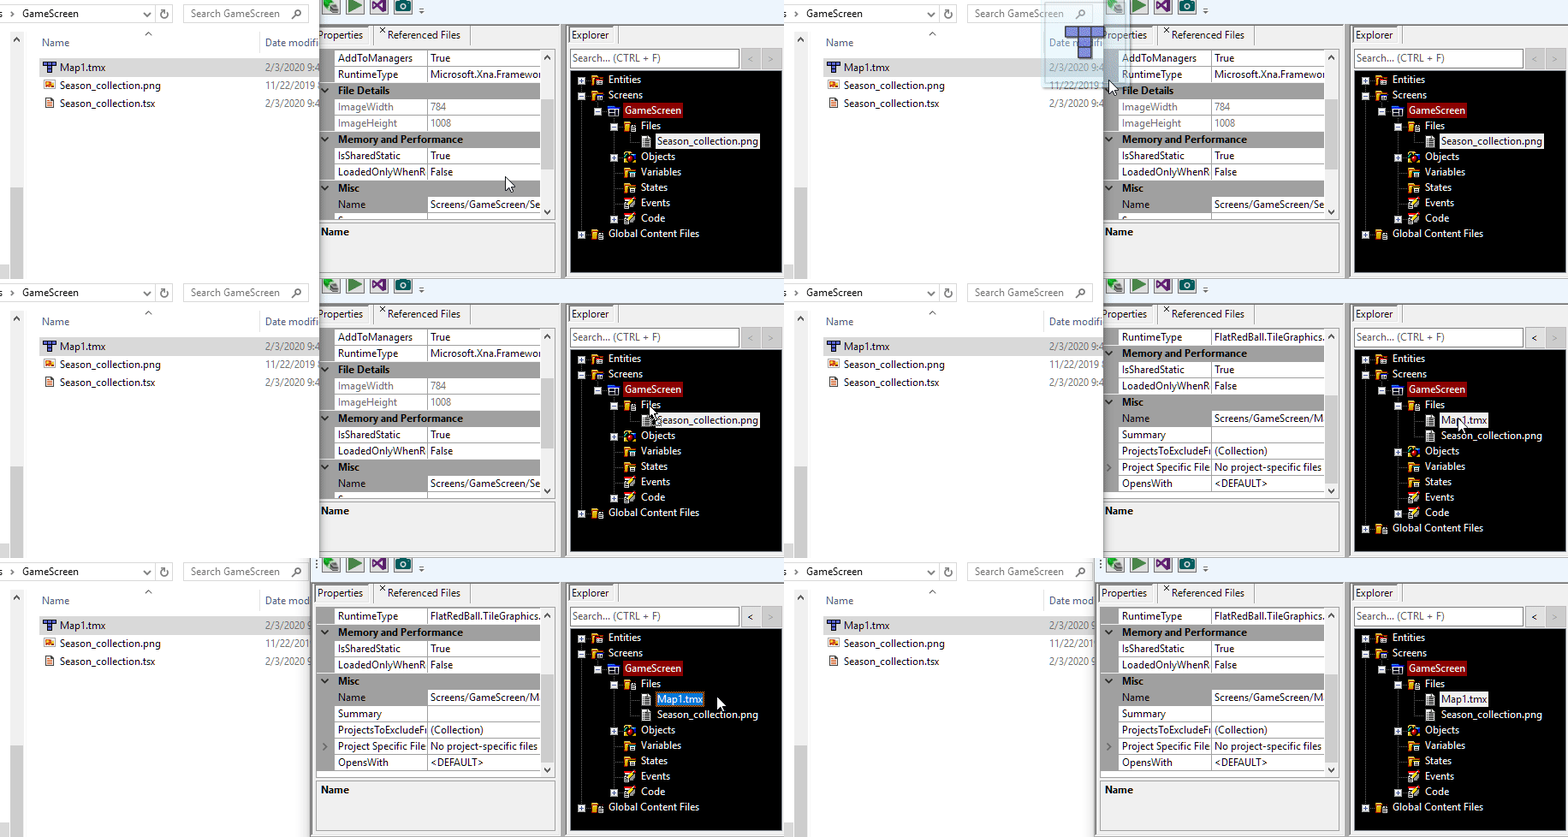
4. Drag+drop the TMX file into your Screen's **Files** folder
No additional code is necessary - your map will now show up in the screen.
### Creating Entities From a TMX
If using the GameScreen/Level pattern, FlatRedBall will automatically set up a Map object which can be used to create entities. If you are creating your own map object manually and you would like to create entities from this map, a small amount of extra work is needed.
#### Creating a Map object for Entity Creation in Glue
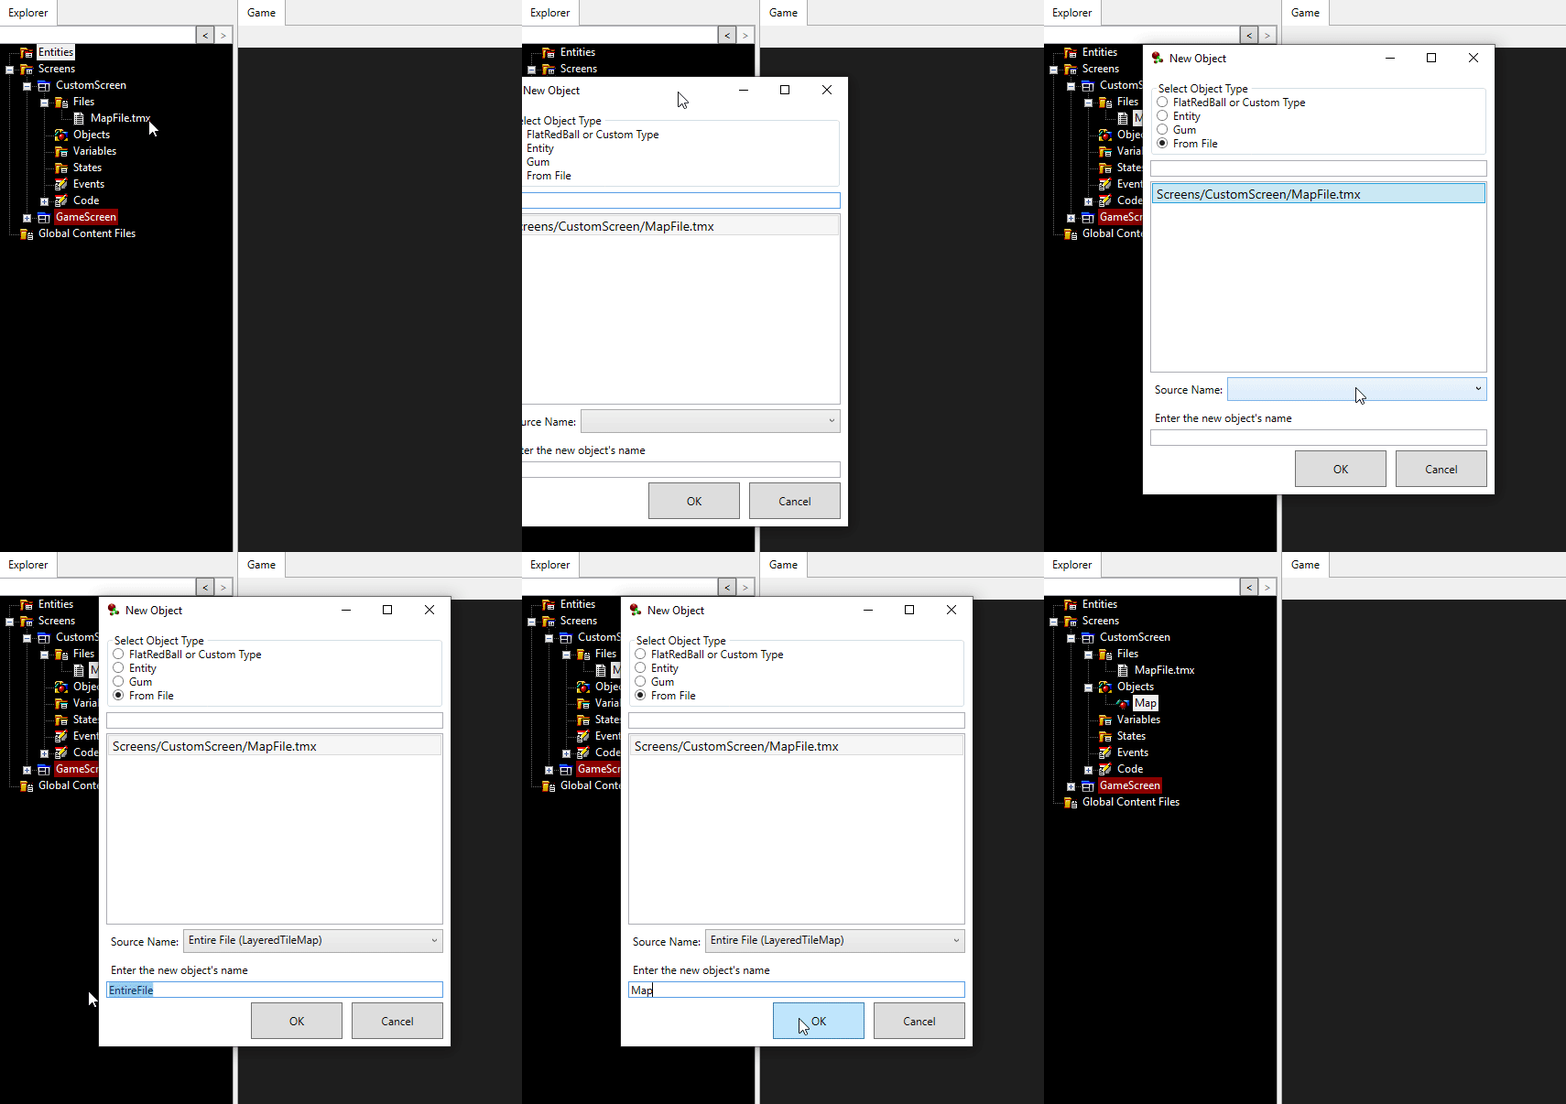
Once you have a TMX file in your screen's Files folder, you can create a Map object by drag+dropping the TMX onto the Screen's Objects folder.
Once the Map object has been created, its **Create Entities From Tiles** property can be checked.

### LayeredTileMap as a list of MapDrawableBatches
The LayeredTileMap is mostly a List of MapDrawableBatches. For example, you can print out information about a MapDrawableBatch as follows:
```
string information = "This map has " + TestLevel.MapLayers.Count + " layers\n";
foreach (var layer in TestLevel.MapLayers)
{
information += "Number of verts: " + layer.Vertices.Length + "\n";
}
```
 \[subpages depth="1"]
---
# Agent Instructions
This documentation is published with GitBook. GitBook is the documentation platform designed so that both humans and AI agents can read, navigate, and reason over technical content effectively. Learn more at gitbook.com.
## Querying This Documentation
If you need additional information that is not directly available in this page, you can query the documentation by asking a question.
Perform an HTTP GET request on the following URL with the `ask` and `goal` query parameters:
```
GET https://docs.flatredball.com/flatredball/tiled-plugin/flatredball-tilegraphics-layeredtilemap.md?ask=&goal=
```
`ask` is the immediate question: it should be specific, self-contained, and written in natural language.
`goal` is what the user is ultimately trying to achieve, the reason they need the answer. Sharing it helps GitBook give you a better, more relevant answer. A goal is most helpful when it describes the outcome the user wants rather than restating the question. For example, with `ask=how do I create an API token`, a goal like `automate deployments from our CI pipeline` lets GitBook tailor the answer to that use case.
The response will contain a direct answer to the question and relevant excerpts and sources from the documentation.
Use this mechanism when the answer is not explicitly present in the current page, you need clarification or additional context, or you want to retrieve related documentation sections.